How to Enable Wireless Adapter on Windows 10
Although a network adapter is an important part of your computer — it connects your PC to your local network, and thus the internet — sometimes you may need to disable it. Regardless of if you need to turn it off to just shut down things you're not using, or to save battery life, or to keep your computer off a network, you have your reasons.
The only problem is that while you can use the Settings app on Windows 10 to manage network settings, Settings doesn't include an option to enable or disable network adapters. Here's how to do it.
In this Windows 10 guide, we'll walk you through the steps to disable and enable a network adapter using GUI and command line tools.
- How to enable or disable network adapters using Control Panel
- How to enable or disable network adapters using Device Manager
- How to enable or disable network adapters using Command Prompt
- How to enable or disable network adapters using PowerShell
How to enable or disable network adapters using Control Panel
On Windows 10, you can use Control Panel to quickly disable and then enable your network adapters as necessary.
Disabling adapter
To disable a network adapter using Control Panel, use these steps:
- Open Settings.
- Click on Network & Security.
-
Click on Status.
Quick Tip: You can also quickly access these settings by right-clicking the network icon in the taskbar and selecting the Network & Internet settings option.
-
Click on Change adapter options.

-
Right-click the network adapter, and select the Disable option.


Enabling adapter
To enable a network adapter using Control Panel, use these steps:
- Open Settings.
- Click on Network & Security.
- Click on Status.
- Click on Change adapter options.
-
Right-click the network adapter, and select the Enable option.


How to enable or disable network adapters using Device Manager
It's also possible to use Device Manager to enable or disable network adapters that you don't need.
Disabling adapter
To disable a network adapter using Device Manager, use these steps:
- Open Start.
- Search for Device Manager, and click the top result.
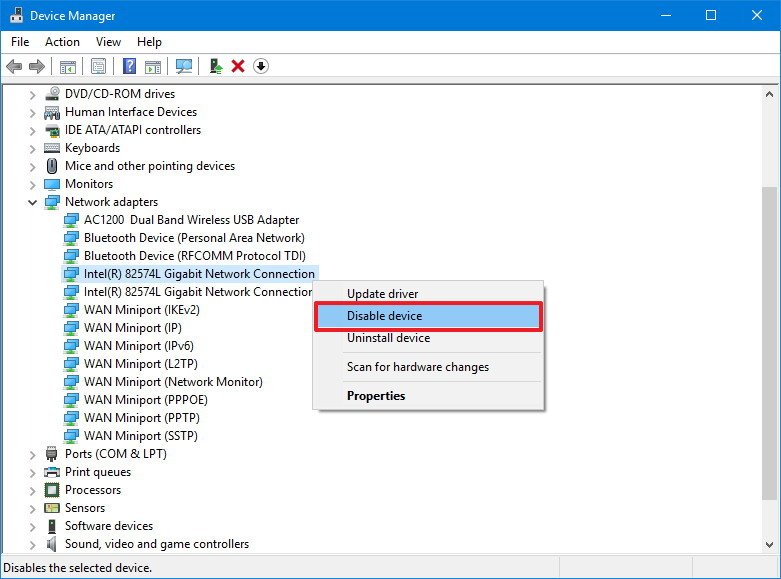
- Expand the Network adapters category.
-
Right-click the adapter you want, and select the Disable device option.

Enabling adapter
To enable a network adapter using Device Manager, use these steps:
- Open Start.
- Search for Device Manager, and click the top result.
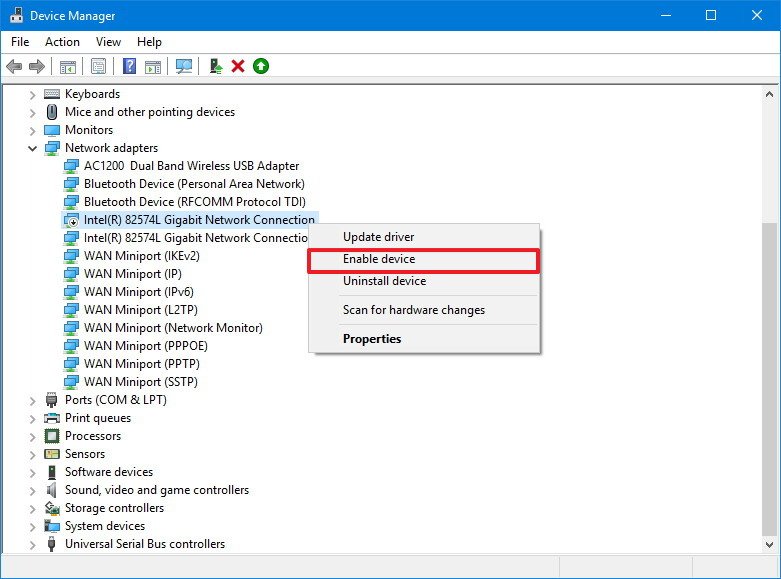
- Expand the Network adapters category.
-
Right-click the adapter you want, and select the Enable device option.

How to enable or disable network adapters using Command Prompt
On Windows 10, you can use the netsh command tool to disable or re-enable network adapters on your device.
Disabling adapter
To disable a network adapter using netsh in Command Prompt, use these steps:
- Open Start.
- Search for Command Prompt, right-click the top result, and select Run as administrator.
-
Type the following command to identify the name of the adapter you want to disable and press Enter:
netsh interface show interface -
Type the following command to disable the Wi-Fi or Ethernet adapter and press Enter:
netsh interface set interface "YOUR-ADAPTER-NAME" disable
In the command remember to specify the name of the adapter you want to disable. The quotation marks are only required if there are spaces within the name.

Enabling adapter
To enable a network adapter using netsh in Command Prompt, use these steps:
- Open Start.
- Search for Command Prompt, right-click the top result, and select Run as administrator.
-
Type the following command to identify the name of the adapter you want to enable and press Enter:
netsh interface show interface -
Type the following command to disable the Wi-Fi or Ethernet adapter and press Enter:
netsh interface set interface "YOUR-ADAPTER-NAME" enable
In the command remember to specify the name of the adapter you want to enable. The quotation marks are only required if there are spaces within the name.

How to enable or disable network adapters using PowerShell
Alternatively, you can even use the PowerShell command line shell to disable or enable any network adapters that you don't use on your PC.
Disabling adapter
To disable a Wi-Fi or Ethernet network adapter on Windows 10 using PowerShell, use these steps:
- Open Start.
- Search for Windows PowerShell, right-click the top result, and select Run as administrator.
-
Type the following command to identify the name of the adapter you want to disable and press Enter:
Get-NetAdapter | format-table -
Type the following command to disable the Wi-Fi or Ethernet adapter and press Enter:
Disable-NetAdapter -Name "YOUR-ADAPTER-NAME" -Confirm:$false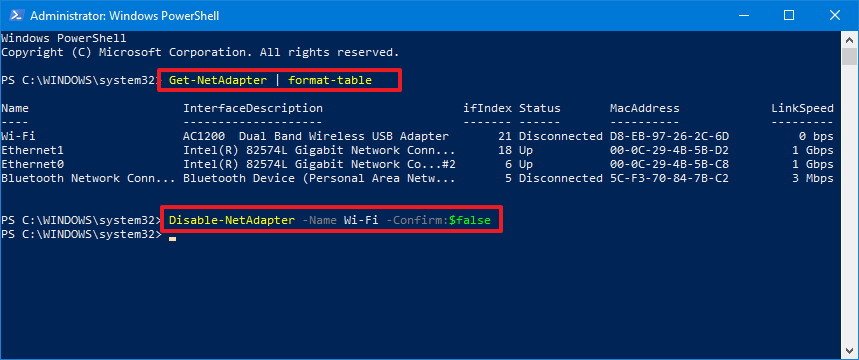
In the command remember to specify the name of the adapter you want to disable. The quotation marks are only required if there are spaces within the name.

Enabling adapter
To enable a network adapter on Windows 10 using PowerShell, use these steps:
- Open Start.
- Search for Windows PowerShell, right-click the top result, and select Run as administrator.
-
Type the following command to identify the name of the adapter you want to enable and press Enter:
Get-NetAdapter | format-table -
Type the following command to disable the Wi-Fi or Ethernet adapter and press Enter:
Enable-NetAdapter -Name "YOUR-ADAPTER-NAME" -Confirm:$false
In the command remember to specify the name of the adapter you want to enable. The quotation marks are only required if there are spaces within the name.

Wrapping things up
Even though the modern experience of Windows 10 doesn't offer a complete set of network settings, there are still many ways to enable or disable network adapters when necessary.
Remember that using the network flyout to turn on or off wireless connections doesn't disable your Wi-Fi adapter, it only disconnects the device from the network.
We're focusing this guide on wireless and wired adapters, but remember that Bluetooth is also a networking device, as such you can use the same instructions to enable or disable the adapter.
What method do you prefer to manage network cards on Windows 10? Tell us in the comments.
More Windows 10 resources
For more helpful articles, coverage, and answers to common questions about Windows 10, visit the following resources:
- Windows 10 on Windows Central – All you need to know
- Windows 10 help, tips, and tricks
- Windows 10 forums on Windows Central

Save on Xbox gear
Best Cyber Monday Xbox Series X deals 2021
Stock of the Xbox Series X will still be hard to find on Cyber Monday but there will be plenty of other items on offer. We're expecting big reductions on some top-of-the-line gaming headsets and if you've been looking to upgrade your storage there will be SSD and HDD offers galore. Controllers, Game Pass, and even TVs all feature too.
How to Enable Wireless Adapter on Windows 10
Source: https://www.windowscentral.com/how-enable-or-disable-wi-fi-and-ethernet-network-adapters-windows-10